VIPY
VIPY is a python package for representation, transformation and visualization of annotated videos and images. Annotations are the ground truth provided by labelers (e.g. object bounding boxes, face identities, temporal activity clips), suitable for training computer vision systems. VIPY provides tools to easily edit videos and images so that the annotations are transformed along with the pixels. This enables a clean interface for transforming complex datasets for input to your computer vision training and testing pipeline.
VIPY provides:
- Representation of videos with labeled activities that can be resized, clipped, rotated, scaled and cropped
- Representation of images with object bounding boxes that can be manipulated as easily as editing an image
- Clean visualization of annotated images and videos
- Lazy loading of images and videos suitable for distributed procesing (e.g. dask, spark)
- Straightforward integration into machine learning toolchains (e.g. torch, numpy)
- Fluent interface for chaining operations on videos and images
- Visual dataset download, unpack and import (e.g. Imagenet21k, Coco 2014, Visual Genome, Open Images V7, Kinetics700, YoutubeBB, ActivityNet, … )
- Video and image web search tools with URL downloading and caching
- Minimum dependencies for easy installation (e.g. AWS Lambda)
Design Goals
Vipy was created with three design goals.
- Simplicity. Annotated Videos and images should be as easy to manipulate as the pixels. We provide a simple fluent API that enables the transformation of media so that pixels are transformed along with the annotations. We provide a comprehensive unit test suite to validate this pipeline with continuous integration.
- Portability. Vipy was designed with the goal of allowing it to be easily retargeted to new platforms. For example, deployment on a serverless architecture such as AWS lambda has restrictions on the allowable code that can be executed in layers. We designed Vipy with minimal dependencies on standard and mature machine learning tool chains (numpy, matplotlib, ffmpeg, pillow) to ensure that it can be ported to new computational environments.
- Efficiency. Vipy is written in pure python with the goal of minimizing memory requirementts for large datasets, and performing in place operations to avoid copies. This enables fast video processing by operating on videos as chains of transformations. The documentation describes when an object is changed in place vs. copied. Furthermore, loading is delayed until explicitly requested by the user (or the pixels are needed) to enable lazy loading for distributed processing.
Getting started
The VIPY tools are designed for simple and intuitive interaction with videos and images.
Try to create a Scene object:
v = vipy.video.RandomScene()
Videos are constructed from URLs (e.g. RTSP/RTMP live camera streams, YouTube videos, public or keyed AWS S3 links), SSH accessible paths, local filenames, Image frame lists, numpy arrays or pytorch tensors.
In this example, we create a random video with tracks and activities.
Videos can be natively iterated:
for im in v:
    print(im.numpy())
This will iterate and yield Image objects corresponding to each frame of the video.
You can use the Image.numpy() method to extract the numpy array for this frame.
Long videos are streamed to avoid out of memory errors.
Under the hood, we represent each video as a filter chain to an FFMPEG pipe, which yields frames corresponding to the appropriate filter transform and framerate.
The yielded frames include all of the objects that are present in the video at that frame accessible with the Scene.objects() method.
VIPY supports more complex iterators. For example, a common use case for activity detection is iterating over short clips in a video. You can do this using the stream iterator:
for c in v.stream().clip(16):
    print(c.torch())
This will yield Scene objects each containing a Stream.clip() of length 16 frames.
Each clip overlaps by 15 frames with the next clip, and each clip includes a threaded copy of the pixels.
This is useful to provide clips of a fixed length that are output for every frame of the video.
Each clip contais the tracks and activities within this clip time period.
The method Video.torch() will output a torch tensor suitable for integration into a pytorch based system.
These python iterators can be combined together in complex ways
for (im, c, imdelay) in (v, v.stream().clip(16), v.stream().frame(delay=10), a_gpu_function(v.stream().batch(16)))
    print(im, c.torch(), imdelay)
This will yield the current frame, a video Stream.clip() of length 16, a Stream.frame() 10 frames ago and a Stream.batch() of 16 frames that is designed for computation and transformation on a GPU.
All of the pixels are copied in threaded processing which is efficiently hidden by GPU I/O bound operations.
For more examples of complex iterators in real world use cases, see the HeyVi package for open source visual analytics.
Videos can be transformed in complex ways, and the pixels will always be transformed along with the annotations.
v.fliplr()          # flip horizontally
v.zeropad(10, 20)   # zero pad the video horizontally and vertically
v.mindim(256)       # change the minimum dimension of the video
v.framerate(10)     # change the framerate of the video
The transformation is lazy and is incorporated into the FFMPEG complex filter chain so that the transformation is applied when the pixels are needed.
You can always access the current filter chain using Video.commandline() which will output a commandline string for the ffmpeg executable that you can use to get a deeper underestanding of the transformations that are applied to the video pixels.
Finally, annotated videos can be displayed.
v.show()
v.show(notebook=True)
v.frame().show()
v.annotate('/path/to/visualization.mp4')
with vipy.video.Video(url='rtmps://youtu.be/...').mindim(512).framerate(5).stream(write=True) as s:
    for im in v.framerate(5):
        s.write(im.annotate().rgb())
This will Scene.show() the video live on your desktop, in a jupyter notebook, show the first Scene.frame() as a static image, Scene.annotate() the video so that annotations are in the pixels and save the corresponding video, or live stream a 5Hz video to youtube.
All of the show methods can be configured to customize the colors or captions.
See the demos for more examples.
Import
Vipy was designed to define annotated videos and imagery as collections of python objects. The core objects for images are:
- vipy.image.Scene
- vipy.object.Detection
- vipy.object.Keypoint2d
- vipy.geometry.BoundingBox
- vipy.geometry.Point2d
The core objects for videos:
See the documentation for each object for how to construct them.
Export
All vipy objects can be imported and exported to JSON for interoperatability with other tool chains. This allows for introspection of the vipy object state in an open format providing transparency
vipy.image.owl().json()
Environment variables
You can set the following environment variables to customize the output of vipy
- VIPY_CACHE='/path/to/directory'. This directory will contain all of the cached downloaded filenames when downloading URLs. For example, the following will download all media to '~/.vipy'.
os.environ['VIPY_CACHE'] = vipy.util.remkdir('~/.vipy')
vipy.image.Image(url='https://upload.wikimedia.org/wikipedia/commons/thumb/2/23/Bubo_virginianus_06.jpg/1920px-Bubo_virginianus_06.jpg').download()
This will output an image object:
<vipy.image: filename="~/.vipy/1920px-Bubo_virginianus_06.jpg", filename="~/.vipy/1920px-Bubo_virginianus_06.jpg", url="https://upload.wikimedia.org/wikipedia/commons/thumb/2/23/Bubo_virginianus_06.jpg/1920px-Bubo_virginianus_06.jpg">
This provides control over where large datasets are cached on your local file system. By default, this will be cached to the system temp directory.
- VIPY_DATASET_REGISTRY_HOME='/path/to/dir'.
This is the directory to download datasets in
registry(). - VIPY_AWS_ACCESS_KEY_ID='MYKEY'. This is the AWS key to download urls of the form "s3://".
- VIPY_AWS_SECRET_ACCESS_KEY='MYKEY'. This is the AWS secret key to download urls of the form "s3://".
- VIPY_BACKEND. This is the Matplotlib backend to use when rendering figure windows. 'Agg' is recommended for headless operation, and 'TkAgg' is recommended for Linux based X11 forwarding. In most cases, matplotlib will choose the best backend available by default, and this environment variable does not need to override this choice.
Versioning
To determine what vipy version you are running you can use:
>>> vipy.__version__
>>> vipy.__version__.is_at_least('1.16.2')
Parallelization
Vipy includes integration with concurrent futures and Dask Distributed for parallel processing of video and images. This is useful for preprocessing of datasets to prepare them for training.
For example, we can construct a Dataset object from one or more videos.
This dataset can be transformed in parallel using two processes:
D = vipy.dataset.Dataset(vipy.video.Scene(filename='/path/to/videofile.mp4'))
with vipy.globals.parallel(2):
    R = D.map(lambda v, outdir='/newpath/to/': v.mindim(128).framerate(5).saveas(so.path.join(outdir, vipy.util.filetail(v.filename()))))
The result is a transformed dataset which contains transformed videos downsampled to have minimum dimension 128, framerate of 5Hz, with the annotations transformed accordingly.
The Dataset.map() method allows for a lambda function to be applied in parallel to all elements in a dataset.
The fluent design of the VIPY objects allows for easy chaining of video operations to be expressed as a lambda function.
VIPY objects are designed for integration into parallel processing tool chains and can be easily serialized and deserialized for sending to parallel worker tasks.
VIPY supports integration with distributed schedulers for massively parallel operation.
D = vipy.dataset.Dataset('/path/to/directory/of/jsonfiles')
with vipy.globals.dask(scheduler='10.0.0.1:8785'):
    R = D.map(lambda v, outdir='/newpath/to': vipy.util.bz2pkl(os.path.join(outdir, '%s.pkl.bz2' % v.videoid()), v.trackcrop().mindim(128).normalize(mean=(128,128,128)).torch()))
This will lazy load a directory of JSON files, where each JSON file corresponds to the annotations of a single video, such as those collected by Visym Collector.
The Dataset.map() method will communicate with a scheduler at a given IP address and port and will process the lambda function in parallel to the workers tasked by the scheduler.
In this example, the video will Scene.trackcrop() the smallest bounding box containing all tracks in the video, resized so this crop is 128 on the smallest side, loaded and normalized to remove the mean, then saved as a torch tensor in a bzipped python pickle file.
This is useful for preprocesssing videos to torch tensors for fast loading of dataset augmentation during training.
Tutorials
The following tutorials show fluent python chains to achieve transformations of annotated images and videos.
Images
Load an image
Images can be loaded from URLs, local image files, or numpy arrays. The images exhibit lazy loading, so that pixels will not be fetched until they are needed.
>>> im = vipy.image.Image(filename='/path/to/in.jpg')
>>> im = vipy.image.Image(url='https://url/to/in.jpg')
>>> im = vipy.image.Image(array=np.random.rand(224,224,3).astype(np.float32))
Print an image representation
All objects have helpful string representations when printed to stdout.
This is accessible via the Image.print() method or by using builtin print().
In this example, an image is created from a wikipedia URL.
Printing this image object shows the URL, but when it is loaded, the image object shows the size of the image, colorspace and the filename that the URL was downloaded to.
When in doubt, print!
>>> print(vipy.image.Scene(url='https://upload.wikimedia.org/wikipedia/commons/thumb/2/23/Bubo_virginianus_06.jpg/1920px-Bubo_virginianus_06.jpg'))
<vipy.image.scene: url=https://upload.wikimedia.org/wikipedia/commons/thumb/2/23/Bubo_virginianus_06.jpg/1920px-Bubo_virginianus_06.jpg>

>>> vipy.image.Scene(url='https://upload.wikimedia.org/wikipedia/commons/thumb/2/23/Bubo_virginianus_06.jpg/1920px-Bubo_virginianus_06.jpg').load().print()
<vipy.image.scene: height=2400, width=1920, color=rgb, filename="/tmp/1920px-Bubo_virginianus_06.jpg", url=https://upload.wikimedia.org/wikipedia/commons/thumb/2/23/Bubo_virginianus_06.jpg/1920px-Bubo_virginianus_06.jpg>
Transform an image
Images can be transformed so that the annotations are updated along with the pixels.
In this example, the owl() is a demo image to a wikipedia URL with a bounding box.
This can be resized and cropped or anisotropically scaled and the box is updated to match the pixels.
>>> im = vipy.image.owl().mindim(512).fliplr().centersquare().show()
>>> im = vipy.image.owl().resize(width=512, height=256).show()
![]()
![]()
Export as numpy array
All images are represented internally as a private attribute vipy.image.Image._array which is a numpy array representation of the pixels.
Image transformations can be chained to operate sequentially on this pixel buffer.
In this example, the owl() test image is cropped to retain the center square, converted from uint8 RGB to float32 greyscale, resized to 224x224 then exported to numpy array.
>>> vipy.image.owl().centersquare().greyscale().mindim(224).numpy()
array([[0.11470564, 0.11794835, 0.13006495, ..., 0.15657625, 0.15867704,
        0.16140679],
       [0.11835834, 0.11993656, 0.12860955, ..., 0.15611856, 0.15460114,
        0.15652661],
       [0.12262769, 0.1245698 , 0.12809968, ..., 0.153694  , 0.15326852,
        0.15336327],
       ...,
       [0.42591274, 0.42745316, 0.4352066 , ..., 0.12994824, 0.13172676,
        0.13424061],
       [0.42972928, 0.43847743, 0.45459685, ..., 0.12558977, 0.12820148,
        0.13141613],
       [0.44050908, 0.45350933, 0.46908155, ..., 0.12246227, 0.1256479 ,
        0.12941177]], dtype=float32)
Display an image
All images can be displayed using the matplotlib library. Matplotlib is the most universally ported GUI library for python, and exhibits minimal dependencies. We enable the user to show images using figure window or "matlab style" of image display. This will show pixels with overlayed semi-transparent bounding boxes for objects with captions.
>>> im = vipy.image.owl().mindim(512).show()
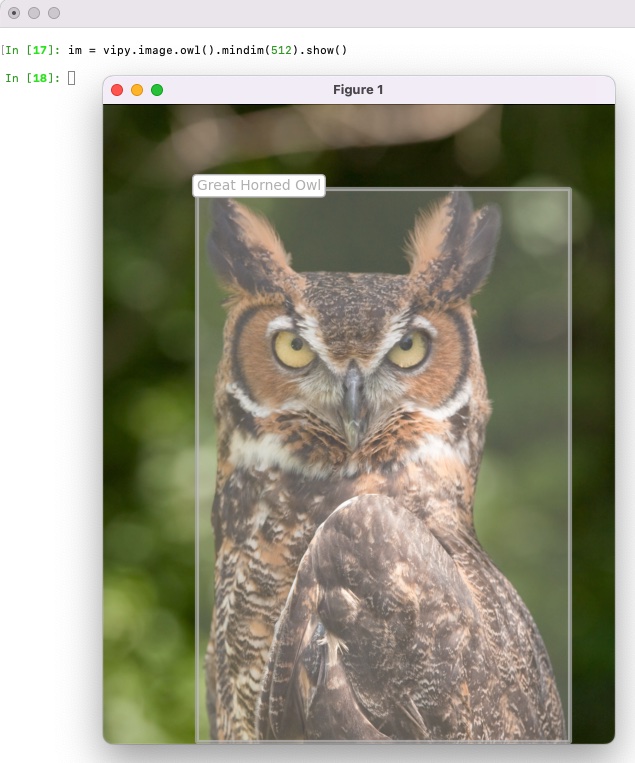
All images can be displayed in a dark theme or a light theme. Light themes show captions on light backgrounds, dark theme shows captions on a dark background.
>>> im = vipy.image.owl().mindim(512).show(theme='dark')
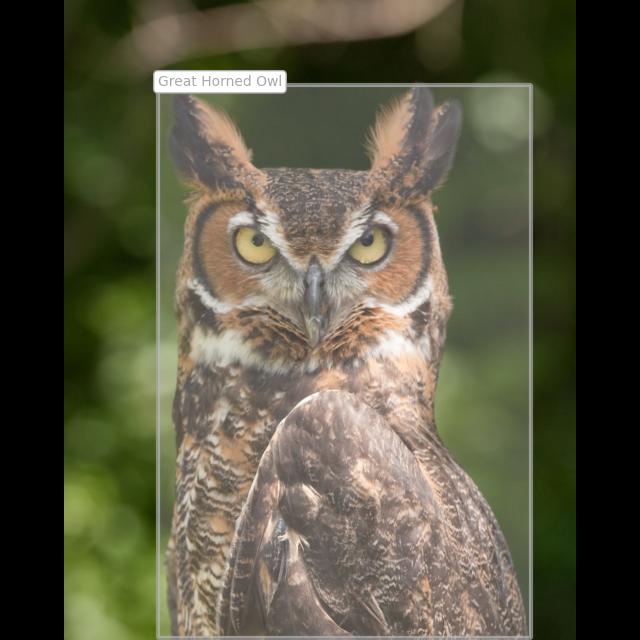
Annotate an image
By default, images and annotations are represented independently.
However, it is sometimes useful to export the annotations into the pixels.
The Scene.annotate() method will export the same visualization as when the image is displayed, but the pixel buffer will be overwritten with the shown image.
This means that calling Image.numpy() will return the pixel buffer with boxes and captions in the pixels.
>>> vipy.image.owl().mindim(512).maxmatte().annotate().rgb().saveas('out.jpg')
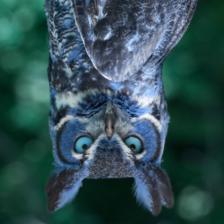
Save an image
Images can be saved (without annotations) using the Image.saveas() method.
Calling this method with no arguments will save to a random temporary image.
In this example, we crop the image, convert from RGB colorspace to BGR colorspace, flip up/down and resize.
>>> vipy.image.owl().centersquare().bgr().flipud().mindim(224).saveas('save_an_image.jpg')
Convert image colorspace
All images can be converted between different colorspaces (e.g. RGB, BGR, RGBA, BGRA, HSV, GREY, LUM, float). This will convert the underlying pixel buffer to support the corresponding colorspace.
>>> vipy.image.owl().hsv().saveas('hsv.jpg')
Rescale image
All images can be rescaled to a standard range, including the Matlab inspired Image.mat2gray(), which will rescale the pixel buffer between [min, max] -> [0, 1]
This rescaling will take advantage of numba optimization if the optimal numba package is installed
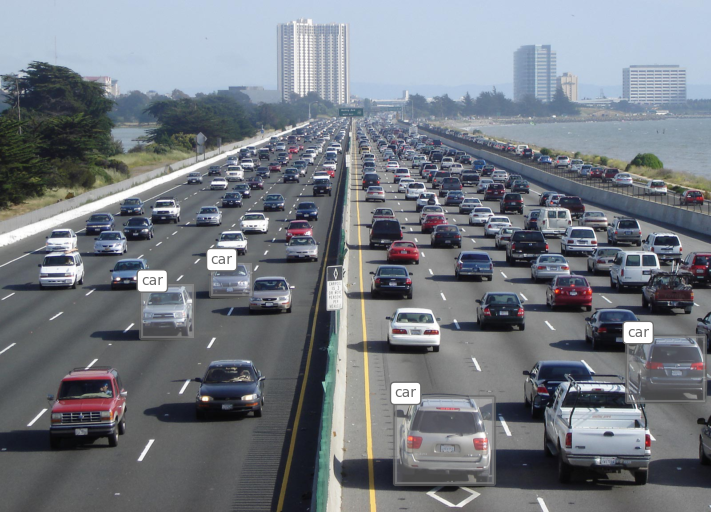
Visualize scenes
Scenes containing objects can be visualized to display only a subset of objects.
In this example, we show the demo image vehicles() which contains four annotated vehicles.
There are many more vehicles in this image, but the end user may be interested in these four in particular.
Each object is represented internally as a list of Detection objects which encodes a bounding box and category.
This can be visualized just as with images with single objects.
>>> vipy.image.vehicles().show().objects()
[<vipy.object.detection: category="car", bbox=(xmin=210.2, ymin=263.2, width=41.1, height=32.6)>,
 <vipy.object.detection: category="car", bbox=(xmin=626.7, ymin=336.0, width=77.9, height=65.5)>,
 <vipy.object.detection: category="car", bbox=(xmin=140.8, ymin=284.5, width=53.1, height=53.1)>,
 <vipy.object.detection: category="car", bbox=(xmin=394.2, ymin=396.8, width=99.5, height=87.4)>]

Get all of the object categories
im = vipy.image.people()
categories = set(o.category() for o in im.objects())
Get all of the object boxes
im = vipy.image.people()
ulbr_boxes = [o.ulbr() for o in im.objects()]  # [(xmin,ymin,xmax,ymax),...] in upper-left-bottom-roght boxformat
xywh_boxes = [o.xywh() for o in im.objects()]  # [(xmin,ymin,width,height),...] in upper-left-width-height box format
Crop and resize annotated objects in a scene
>>> im = vipy.image.vehicles().show()
>>> vipy.visualize.montage([o.objectsquare(dilate=1.2) for o in im]).show()
When iterating over a scene, each object yielded is a Scene with a single object.
Objectsquare will crop the image using the bounding box equal to the union of all boxes in the current scene.
dilate will expand the size of the object bounding boxes by a scale factor.
The result is a cropped square image for each object that is centered on the object.
You can access the pixels for each cropped object, with ot without forcing the cropped region to be square:
>>> pixels = [o.objectsquare(dilate=1.2).array() for o in im]
>>> pixels = [o.objectcrop(dilate=1.2).array() for o in im]  # don't force cropped region to be square
As with all other Scene objects, the original image can be arbitrarily transformed such as resizing or padded prior to exporting the object pixels.
Find all images in directory
Searching for all images recursively from a root directory and lazy load them as Image objects.
This will not trigger loading pixels until the pixel buffers are needed.
This is helpful for importing large number of images.
>>> [vipy.image.Image(filename=f) for f in vipy.util.findimages('./docs/tutorials')]
[<vipy.image: filename="/Users/myaccount/dev/vipy/docs/tutorials/transform_an_image_1.jpg">, <vipy.image: filename="/Users/myaccount/dev/vipy/docs/tutorials/transform_an_image_2.jpg">, ...
Export scene to JSON
All annotated images can be imported and exported to an open JSON format. If images are loaded, then the pixels will be serialized in the JSON output. If this is not desired, then use the `vipy.image.Image.flush`` method to clear the cached pixel buffer prior to serialization. This can always be reloaded after deserialization as long as the source image or URL is acessible.
>>> json = vipy.image.owl().flush().json()
>>> im = vipy.image.Scene.from_json(json)
>>> print(json)
'{"_filename":"\/Users\/myaccount\/.vipy\/1920px-Bubo_virginianus_06.jpg","_url":"https:\/\/upload.wikimedia.org\/wikipedia\/commons\/thumb\/2\/23\/Bubo_virginianus_06.jpg\/1920px-Bubo_virginianus_06.jpg","_loader":null,"_array":null,"_colorspace":"rgb","attributes":{},"_category":"Nature","_objectlist":[{"_xmin":93.33333333333333,"_ymin":85.33333333333333,"_xmax":466.6666666666667,"_ymax":645.3333333333334,"_id":"a047e21d","_label":"Great Horned Owl","_shortlabel":"Great Horned Owl"}]}'
Export scene to CSV
All annotated images can be exported to a CSV format using object iterators.
Object precision can be changed using BoundingBox.int().
CSV headers can be added with writecsv().
>>> im = vipy.image.vehicles()
>>> vipy.util.writecsv([(im.filename(), o.category(), o.xmin(), o.ymin(), o.width(), o.height()) for o in im.objects()], 'out.csv')
>>> cat out.csv
/Users/myaccount/.vipy/I-80_Eastshore_Fwy.jpg,car,210.2222222222222,263.2,41.06666666666666,32.622222222222206
/Users/myaccount/.vipy/I-80_Eastshore_Fwy.jpg,car,626.6666666666666,336.0444444444444,77.86666666666667,65.4666666666667
/Users/myaccount/.vipy/I-80_Eastshore_Fwy.jpg,car,140.84444444444443,284.4888888888889,53.066666666666634,53.111111111111086
/Users/myaccount/.vipy/I-80_Eastshore_Fwy.jpg,car,394.17777777777775,396.84444444444443,99.4666666666667,87.37777777777774
Image deduplication
Vipy provides a 128 bit differential perceptual hashing function which is used for near-duplicate detection. This is useful for identifying pairs of images that differ slightly due to cropping, resizing, watermarkings. The binary Hamming distance between two perceptual hashes is a similarity metric that can be used to identify duplicates, such that smaller is more likely to be a duplicate.
>>> p = vipy.image.vehicles().perceptualhash()  # hex string
>>> print(p)
'50515541d545f04101a005e801c25945'
>>> q = vipy.image.vehicles().greyscale().perceptualhash()
>>> print(q)
'50515541d545f04101a905e801c27945'
>>> vipy.image.Image.perceptualhash_distance(p, q)  # Hamming distance
3
The perceptual hash function also allows for ignoring detected objects in the foreground.
A background hash Scene.bghash() computes the perceptual hash function using only the regions not contained within the foreground bounding boxes.
This is useful for identifying near duplicate background locations where there may be different foreground objects in the scene between images.
If the Scene has no associated foreground objects, then the background hash is equivalent to the perceptual hash above.
Blur Faces
>>> im = vipy.image.Image(url='https://upload.wikimedia.org/wikipedia/en/d/d6/Friends_season_one_cast.jpg')
>>> im.facepixelize().show()
>>> im.faceblur().show()

This is an experimental feature and may be removed in future releases.
Data augmentation for training
Data augmentation is the process of introducing synthetic transformations of a given image to introduce additional variation during training. Data augmentation considers scales, crops, translations, mirrors, rotations or chromatic noise which are applied to a source image to generate one or more augmentations. All pixel buffers are shared by default for speed, so the clone() method will enforce that pixel buffers are copied when needed.
im = vipy.image.vehicles()
vipy.visualize.montage([[o.crop().fliplr(),                # spatial mirror
                         o.clone().dilate(1.2).crop(),     # zoom out
                         o.clone().translate(4,5).crop(),  # translation
                         o.clone().translate(-2,9).crop(), # translation
                         o.clone().dilate(0.8).crop(),     # zoom in
                         o.crop().blur(sigma=1),           # spatial blur
                         o.crop().additive_noise()]        # chromatic noise
                         for o in im])                     # for all objects in the scene
These functions have been integrated into a single package vipy.noise which implements photometric and geometric perturbations.
im = vipy.image.vehicles()
new_im = vipy.noise.randomcrop(im)
The image returned is cloned, and includes the provenance of the noise source in new_im.attributes
Vipy and Torchvision
All vipy objects can be exported to torch tensors:
im = vipy.image.vehicles().load().tensor(order='CHW')
with axis permutations to export in channel first order used by pytorch tensors.
Visualization behind SSH
Data repositories are often accessed via data storage behind SSH. You can set up port forwarding to visualize this data, but this may require root access to configure firewall rules. If you have SSH public key access to your cluster machine, you can do the following:
On a remote machine (e.g. the cluster machine you have accessed via ssh), run:
remote>>> vipy.util.scpsave(vipy.image.owl())
[vipy.util.scpsave]: On a local machine where you have public key ssh access to this remote machine run:
>>> V = vipy.util.scpload('scp://hostname:/var/folders/sn/6n34qjp513742_5y3lvmhnlw0000gn/T/c4237a25a99b776f.json')
Then, on your local machine (e.g. your laptop), run the command output above:
local>>> print(vipy.util.scpload('scp://hostname:/var/folders/sn/6n34qjp513742_5y3lvmhnlw0000gn/T/c4237a25a99b776f.json'))
<vipy.image.scene: height=640, width=512, color=rgb, filename="/tmp/.vipy/1920px-Bubo_virginianus_06.jpg", url=https://upload.wikimedia.org/wikipedia/commons/thumb/2/23/Bubo_virginianus_06.jpg/1920px-Bubo_virginianus_06.jpg, category="Nature", objects=1>
The method scpsave() will save a list of vipy objects to a temporary archive file, such that the URL of each object is prepended with "scp://".
When calling scpload() on the local machine, this will fetch the pickle file from the remote machine via scp using the default public key.
Then, when each vipy object is accessed, it will fetch the URL of the media object via scp from the remote machine.
This provides an on-demand fetching of each image from a data storage behind a SSH server without any port forwarding, and uses public key scp.
This allows for visualization of datasets that cannot be copied locally, but can be reduced on the local machine which are then fetched for visualization.
Visualization behind AWS S3
Data repositories are often stored with cloud service providers, such as Amazon AWS. These providers require credentials to access URLs in Simple Storage Service (S3). Vipy supports accessing AWS S3 URLs with credential restricted access. Set the following environment variables for the access key and secret access key provided by Amazon AWS. Follow the links below to get a key:
- VIPY_AWS_ACCESS_KEY_ID='MYKEY'. This is the AWS key to download urls of the form "s3://".
- VIPY_AWS_SECRET_ACCESS_KEY='MYKEY'. This is the AWS secret key to download urls of the form "s3://".
Then prepend the URL scheme "s3://BUCKET_NAME.s3.amazonaws.com/OBJECT_PATH" when constructing a URL. Here is an example that we use for Visym Collector to store videos uploaded from around the world:
>>> vipy.image.Image(url="s3://bucket/path/to/file.mp4")
Finally, if the credentials you provide are authorized to access this bucket and object, then this object will be downloaded on-demand when the pixels are needed. This provides a convenient method of on-demand downloading and caching of large datasets.
Videos
Load from YouTube
v = vipy.video.Video(url='https://youtu.be/kpBCzzzX6zA').download()
Inspect the FFMPEG command line
print(vipy.video.Video(filename='/path/to/in.mp4').mindim(512).framerate(2).commandline())
'ffmpeg -i /path/to/in.mp4 -filter_complex "[0]fps=fps=2.0:round=up[s0];[s0]scale=-1:512[s1]" -map "[s1]" dummyfile'
Export frames as vipy images
frames = [im for im in v.framerate(1)] # 1 Hz export
Export frames as numpy array
frames = v.framerate(0.1).numpy() # 0.1 Hz export
Generate WEBP animations
v = vipy.video.RandomScene().clip(0,30).webp()
Find all videos in directory
dataset = vipy.dataset.Dataset.from_directory('/path/to/dir', filetype='mp4')
Import RTSP camera streams
v = vipy.video.Video(url='rtsp://user:password@10.0.1.19/live0')
An RTSP camera can be modified to change the framerate or the resolution then the video can be streamed live or iterated as with other videos'
vipy.video.Video(url='rtsp://user:password@10.0.1.19/live0', framerate=5).mindim(256).show()
To grab a single frame:
im = vipy.video.Video(url='rtsp://user:password@10.0.1.19/live0').frame()
To iterate:
for im in vipy.video.Video(url='rtsp://user:password@10.0.1.19/live0'):
    print(im)
To save to a video file:
vipy.video.Video(url='rtsp://user:password@10.0.1.19/live0').save('/path/to/video.mp4')
You will need to interrupt the saving when you're done and the video up to that point will be available in the video file
Split a video into activity clips
clips = vipy.video.RandomScene().activityclip()
Each clip is a separate video with a single activity, such that the video is clipped at the temporal extent of this activity
Split a video into track clips
clips = vipy.video.RandomScene().trackclip()
Each clip is a separate video with a single track, such that the video is clipped at the temporal extent of this track
Create quicklooks for fast video watching
vipy.video.RandomScene().quicklook(),show()
A quicklook is a montage constructed by nine frames sampled from the video. This is a convenient way to visualize a video
Export to JSON
vipy.video.RandomScene().flush().json()
Datasets
Load a dataset from the registry
vipy.dataset.registry('mnist')
The registry is the common entry point for loading collections of annotated visual data. The datasets are downloaded and imported when requested. Datasets are constructed as a large number of python objects, which can lead to slow garbage collection. During registry import, the garbage collector is frozen by default, so that the loaded dataset is disabled for reference cycle counting.
Shuffling
Shuffling a dataset uniformly at random can lead to inefficiencies due to random data access.
The vipy.dataset.Datase.shuffle method support uniform random shuffling, but it will attempt to use a more efficient streaming shuffler to allow for iterative access rather than random access.
This streaming shuffler will shuffle the underlying dataset (or dataset shards) rather than shuffling the dataset index.
This leads to better data locality in data access and more efficient iterative access for large datasets.
Download a dataset with URLs
with vipy.parallel.multiprocessing(4):
    vipy.dataset.registry('kinetics').map(vipy.video.Transform.downloader(outdir='/tmp'))
This will download the youtube videos from the kinetics dataset with four parallel processes. Videos will be stored in the requested outdir.
Create a dataset from images
D = vipy.dataset.Dataset.from_directory('/path/to/dir', filetype='images')
Determine the set of classes
trainset = vipy.dataset.registry('cifar10')
print(trainset.set(lambda im: im.category()))
Count objects in a scene
im = vipy.dataset.registry('coco_2014').takeone()
vipy.dataset.Dataset(im.objects()).frequency(lambda o: o.category())
Return a dictionary of the counts of object categories from a random coco-2014 scene.
Take a subset
trainset = vipy.dataset.registry('cifar10')
print(trainset.take(1024))
Compute inverse frequency weights
vipy.dataset.registry('cifar10').inverse_frequency(lambda im: im.category())
These weights can be used for weighting a loss function for imbalanced classes.
Iterate over minibatches
for b in vipy.dataset.registry('cifar10').minibatch(128):
     print(b)
Iterate over minibatches with parallel preprocessing
with vipy.globals.multiprocessing(4):
    for b in vipy.dataset.registry('cifar10').minibatch(128, loader=vipy.image.Transform.to_tensor(shape=(16,16), gain=1/255)):
        print(b)  # these batches have been preprocessed to shape (16,16) and in the range [0,1]
Combine datasets as a union
vipy.dataset.registry(('mnist', 'cifar10', 'caltech101'))
A dataset untion will iterate over the component datasets
Contact
Visym Labs <info@visym.com>
Expand source code Browse git
"""
VIPY is a python package for representation, transformation and visualization of annotated videos and images. Annotations are the ground truth provided by labelers (e.g. object bounding boxes, face identities, temporal activity clips), suitable for training computer vision systems. VIPY provides tools to easily edit videos and images so that the annotations are transformed along with the pixels. This enables a clean interface for transforming complex datasets for input to your computer vision training and testing pipeline.
VIPY provides:
* Representation of videos with labeled activities that can be resized, clipped, rotated, scaled and cropped
* Representation of images with object bounding boxes that can be manipulated as easily as editing an image
* Clean visualization of annotated images and videos
* Lazy loading of images and videos suitable for distributed procesing (e.g. dask, spark)
* Straightforward integration into machine learning toolchains (e.g. torch, numpy)
* Fluent interface for chaining operations on videos and images
* Visual dataset download, unpack and import (e.g. Imagenet21k, Coco 2014, Visual Genome, Open Images V7, Kinetics700, YoutubeBB, ActivityNet, ... )
* Video and image web search tools with URL downloading and caching
* Minimum dependencies for easy installation (e.g. AWS Lambda)
# Design Goals
Vipy was created with three design goals.
* **Simplicity**. Annotated Videos and images should be as easy to manipulate as the pixels. We provide a simple fluent API that enables the transformation of media so that pixels are transformed along with the annotations. We provide a comprehensive unit test suite to validate this pipeline with continuous integration.
* **Portability**. Vipy was designed with the goal of allowing it to be easily retargeted to new platforms. For example, deployment on a serverless architecture such as AWS lambda has restrictions on the allowable code that can be executed in layers. We designed Vipy with minimal dependencies on standard and mature machine learning tool chains (numpy, matplotlib, ffmpeg, pillow) to ensure that it can be ported to new computational environments.
* **Efficiency**. Vipy is written in pure python with the goal of minimizing memory requirementts for large datasets, and performing in place operations to avoid copies. This enables fast video processing by operating on videos as chains of transformations. The documentation describes when an object is changed in place vs. copied. Furthermore, loading is delayed until explicitly requested by the user (or the pixels are needed) to enable lazy loading for distributed processing.
# Getting started
The VIPY tools are designed for simple and intuitive interaction with videos and images. Try to create a `vipy.video.Scene` object:
```python
v = vipy.video.RandomScene()
```
Videos are constructed from URLs (e.g. RTSP/RTMP live camera streams, YouTube videos, public or keyed AWS S3 links), SSH accessible paths, local filenames, `vipy.image.Image` frame lists, numpy arrays or pytorch tensors. In this example, we create a random video with tracks and activities. Videos can be natively iterated:
```python
for im in v:
print(im.numpy())
```
This will iterate and yield `vipy.image.Image` objects corresponding to each frame of the video. You can use the `vipy.image.Image.numpy` method to extract the numpy array for this frame. Long videos are streamed to avoid out of memory errors. Under the hood, we represent each video as a filter chain to an FFMPEG pipe, which yields frames corresponding to the appropriate filter transform and framerate. The yielded frames include all of the objects that are present in the video at that frame accessible with the `vipy.image.Scene.objects` method.
VIPY supports more complex iterators. For example, a common use case for activity detection is iterating over short clips in a video. You can do this using the stream iterator:
```python
for c in v.stream().clip(16):
print(c.torch())
```
This will yield `vipy.video.Scene` objects each containing a `vipy.video.Stream.clip` of length 16 frames. Each clip overlaps by 15 frames with the next clip, and each clip includes a threaded copy of the pixels. This is useful to provide clips of a fixed length that are output for every frame of the video. Each clip contais the tracks and activities within this clip time period. The method `vipy.video.Video.torch` will output a torch tensor suitable for integration into a pytorch based system.
These python iterators can be combined together in complex ways
```python
for (im, c, imdelay) in (v, v.stream().clip(16), v.stream().frame(delay=10), a_gpu_function(v.stream().batch(16)))
print(im, c.torch(), imdelay)
```
This will yield the current frame, a video `vipy.video.Stream.clip` of length 16, a `vipy.video.Stream.frame` 10 frames ago and a `vipy.video.Stream.batch` of 16 frames that is designed for computation and transformation on a GPU. All of the pixels are copied in threaded processing which is efficiently hidden by GPU I/O bound operations. For more examples of complex iterators in real world use cases, see the [HeyVi package](https://github.com/visym/heyvi) for open source visual analytics.
Videos can be transformed in complex ways, and the pixels will always be transformed along with the annotations.
```python
v.fliplr() # flip horizontally
v.zeropad(10, 20) # zero pad the video horizontally and vertically
v.mindim(256) # change the minimum dimension of the video
v.framerate(10) # change the framerate of the video
```
The transformation is lazy and is incorporated into the FFMPEG complex filter chain so that the transformation is applied when the pixels are needed. You can always access the current filter chain using `vipy.video.Video.commandline` which will output a commandline string for the ffmpeg executable that you can use to get a deeper underestanding of the transformations that are applied to the video pixels.
Finally, annotated videos can be displayed.
```python
v.show()
v.show(notebook=True)
v.frame().show()
v.annotate('/path/to/visualization.mp4')
with vipy.video.Video(url='rtmps://youtu.be/...').mindim(512).framerate(5).stream(write=True) as s:
for im in v.framerate(5):
s.write(im.annotate().rgb())
```
This will `vipy.video.Scene.show` the video live on your desktop, in a jupyter notebook, show the first `vipy.video.Scene.frame` as a static image, `vipy.video.Scene.annotate` the video so that annotations are in the pixels and save the corresponding video, or live stream a 5Hz video to youtube. All of the show methods can be configured to customize the colors or captions.
See the [demos](https://github.com/visym/vipy/tree/master/demo) for more examples.
## Import
Vipy was designed to define annotated videos and imagery as collections of python objects. The core objects for images are:
* [vipy.image.Scene](image.html#vipy.image.Scene)
* [vipy.object.Detection](object.html#vipy.object.Detection)
* [vipy.object.Keypoint2d](object.html#vipy.object.Keypoint2d)
* [vipy.geometry.BoundingBox](geometry.html#vipy.geometry.BoundingBox)
* [vipy.geometry.Point2d](geometry.html#vipy.geometry.Point2d)
The core objects for videos:
* [vipy.video.Scene](video.html#vipy.video.Scene)
* [vipy.object.Track](object.html#vipy.object.Track)
* [vipy.activity.Activity](activity.html#vipy.activity.Activity)
See the documentation for each object for how to construct them.
## Export
All vipy objects can be imported and exported to JSON for interoperatability with other tool chains. This allows for introspection of the vipy object state in an open format providing transparency
```python
vipy.image.owl().json()
```
## Environment variables
You can set the following environment variables to customize the output of vipy
* **VIPY_CACHE**='/path/to/directory'. This directory will contain all of the cached downloaded filenames when downloading URLs. For example, the following will download all media to '~/.vipy'.
```python
os.environ['VIPY_CACHE'] = vipy.util.remkdir('~/.vipy')
vipy.image.Image(url='https://upload.wikimedia.org/wikipedia/commons/thumb/2/23/Bubo_virginianus_06.jpg/1920px-Bubo_virginianus_06.jpg').download()
```
This will output an image object:
```python
<vipy.image: filename="~/.vipy/1920px-Bubo_virginianus_06.jpg", filename="~/.vipy/1920px-Bubo_virginianus_06.jpg", url="https://upload.wikimedia.org/wikipedia/commons/thumb/2/23/Bubo_virginianus_06.jpg/1920px-Bubo_virginianus_06.jpg">
```
This provides control over where large datasets are cached on your local file system. By default, this will be cached to the system temp directory.
* **VIPY_DATASET_REGISTRY_HOME**='/path/to/dir'. This is the directory to download datasets in `vipy.dataset.registry`.
* **VIPY_AWS_ACCESS_KEY_ID**='MYKEY'. This is the [AWS key](https://docs.aws.amazon.com/general/latest/gr/aws-sec-cred-types.html) to download urls of the form "s3://".
* **VIPY_AWS_SECRET_ACCESS_KEY**='MYKEY'. This is the [AWS secret key](https://docs.aws.amazon.com/general/latest/gr/aws-sec-cred-types.html) to download urls of the form "s3://".
* **VIPY_BACKEND**. This is the [Matplotlib backend](https://matplotlib.org/stable/users/explain/backends.html) to use when rendering figure windows. 'Agg' is recommended for headless operation, and 'TkAgg' is recommended for Linux based X11 forwarding. In most cases, matplotlib will choose the best backend available by default, and this environment variable does not need to override this choice.
## Versioning
To determine what vipy version you are running you can use:
>>> vipy.__version__
>>> vipy.__version__.is_at_least('1.16.2')
## Parallelization
Vipy includes integration with [concurrent futures](https://docs.python.org/3/library/concurrent.futures.html) and [Dask Distributed](https://distributed.dask.org) for parallel processing of video and images. This is useful for preprocessing of datasets to prepare them for training.
For example, we can construct a `vipy.dataset.Dataset` object from one or more videos. This dataset can be transformed in parallel using two processes:
```python
D = vipy.dataset.Dataset(vipy.video.Scene(filename='/path/to/videofile.mp4'))
with vipy.globals.parallel(2):
R = D.map(lambda v, outdir='/newpath/to/': v.mindim(128).framerate(5).saveas(so.path.join(outdir, vipy.util.filetail(v.filename()))))
```
The result is a transformed dataset which contains transformed videos downsampled to have minimum dimension 128, framerate of 5Hz, with the annotations transformed accordingly. The `vipy.dataset.Dataset.map` method allows for a lambda function to be applied in parallel to all elements in a dataset. The fluent design of the VIPY objects allows for easy chaining of video operations to be expressed as a lambda function. VIPY objects are designed for integration into parallel processing tool chains and can be easily serialized and deserialized for sending to parallel worker tasks.
VIPY supports integration with distributed schedulers for massively parallel operation.
```python
D = vipy.dataset.Dataset('/path/to/directory/of/jsonfiles')
with vipy.globals.dask(scheduler='10.0.0.1:8785'):
R = D.map(lambda v, outdir='/newpath/to': vipy.util.bz2pkl(os.path.join(outdir, '%s.pkl.bz2' % v.videoid()), v.trackcrop().mindim(128).normalize(mean=(128,128,128)).torch()))
```
This will lazy load a directory of JSON files, where each JSON file corresponds to the annotations of a single video, such as those collected by [Visym Collector](https://visym.github.io/collector). The `vipy.dataset.Dataset.map` method will communicate with a [scheduler](https://docs.dask.org/en/stable/how-to/deploy-dask/ssh.html) at a given IP address and port and will process the lambda function in parallel to the workers tasked by the scheduler. In this example, the video will `vipy.video.Scene.trackcrop` the smallest bounding box containing all tracks in the video, resized so this crop is 128 on the smallest side, loaded and normalized to remove the mean, then saved as a torch tensor in a bzipped python pickle file. This is useful for preprocesssing videos to torch tensors for fast loading of dataset augmentation during training.
# Tutorials
The following tutorials show fluent python chains to achieve transformations of annotated images and videos.
## Images
### Load an image
Images can be loaded from URLs, local image files, or numpy arrays. The images exhibit lazy loading, so that pixels will not be fetched until they are needed.
```python
>>> im = vipy.image.Image(filename='/path/to/in.jpg')
>>> im = vipy.image.Image(url='https://url/to/in.jpg')
>>> im = vipy.image.Image(array=np.random.rand(224,224,3).astype(np.float32))
```
### Print an image representation
All objects have helpful string representations when printed to stdout. This is accessible via the `vipy.image.Image.print` method or by using builtin print(). In this example, an image is created from a wikipedia URL. Printing this image object shows the URL, but when it is loaded, the image object shows the size of the image, colorspace and the filename that the URL was downloaded to. When in doubt, print!
```python
>>> print(vipy.image.Scene(url='https://upload.wikimedia.org/wikipedia/commons/thumb/2/23/Bubo_virginianus_06.jpg/1920px-Bubo_virginianus_06.jpg'))
<vipy.image.scene: url=https://upload.wikimedia.org/wikipedia/commons/thumb/2/23/Bubo_virginianus_06.jpg/1920px-Bubo_virginianus_06.jpg>
>>> vipy.image.Scene(url='https://upload.wikimedia.org/wikipedia/commons/thumb/2/23/Bubo_virginianus_06.jpg/1920px-Bubo_virginianus_06.jpg').load().print()
<vipy.image.scene: height=2400, width=1920, color=rgb, filename="/tmp/1920px-Bubo_virginianus_06.jpg", url=https://upload.wikimedia.org/wikipedia/commons/thumb/2/23/Bubo_virginianus_06.jpg/1920px-Bubo_virginianus_06.jpg>
```
### Transform an image
Images can be transformed so that the annotations are updated along with the pixels. In this example, the `vipy.image.owl` is a demo image to a wikipedia URL with a bounding box. This can be resized and cropped or anisotropically scaled and the box is updated to match the pixels.
```python
>>> im = vipy.image.owl().mindim(512).fliplr().centersquare().show()
>>> im = vipy.image.owl().resize(width=512, height=256).show()
```
<img src="https://raw.githubusercontent.com/visym/vipy/master/docs/tutorials/transform_an_image_1.jpg" height="250">
<img src="https://raw.githubusercontent.com/visym/vipy/master/docs/tutorials/transform_an_image_2.jpg" height="250">
### Export as numpy array
All images are represented internally as a private attribute `vipy.image.Image._array` which is a numpy array representation of the pixels. Image transformations can be chained to operate sequentially on this pixel buffer. In this example, the `vipy.image.owl` test image is cropped to retain the center square, converted from uint8 RGB to float32 greyscale, resized to 224x224 then exported to numpy array.
```python
>>> vipy.image.owl().centersquare().greyscale().mindim(224).numpy()
array([[0.11470564, 0.11794835, 0.13006495, ..., 0.15657625, 0.15867704,
0.16140679],
[0.11835834, 0.11993656, 0.12860955, ..., 0.15611856, 0.15460114,
0.15652661],
[0.12262769, 0.1245698 , 0.12809968, ..., 0.153694 , 0.15326852,
0.15336327],
...,
[0.42591274, 0.42745316, 0.4352066 , ..., 0.12994824, 0.13172676,
0.13424061],
[0.42972928, 0.43847743, 0.45459685, ..., 0.12558977, 0.12820148,
0.13141613],
[0.44050908, 0.45350933, 0.46908155, ..., 0.12246227, 0.1256479 ,
0.12941177]], dtype=float32)
```
### Display an image
All images can be displayed using the matplotlib library. Matplotlib is the most universally ported GUI library for python, and exhibits minimal dependencies. We enable the user to show images using figure window or "matlab style" of image display. This will show pixels with overlayed semi-transparent bounding boxes for objects with captions.
```python
>>> im = vipy.image.owl().mindim(512).show()
```
<img src="https://raw.githubusercontent.com/visym/vipy/master/docs/tutorials/display_an_image.jpg" height="500">
All images can be displayed in a dark theme or a light theme. Light themes show captions on light backgrounds, dark theme shows captions on a dark background.
```python
>>> im = vipy.image.owl().mindim(512).show(theme='dark')
```
### Annotate an image
By default, images and annotations are represented independently. However, it is sometimes useful to export the annotations into the pixels. The `vipy.image.Scene.annotate` method will export the same visualization as when the image is displayed, but the pixel buffer will be overwritten with the shown image. This means that calling `vipy.image.Image.numpy` will return the pixel buffer with boxes and captions in the pixels.
```python
>>> vipy.image.owl().mindim(512).maxmatte().annotate().rgb().saveas('out.jpg')
```
<img src="https://raw.githubusercontent.com/visym/vipy/master/docs/tutorials/annotate_an_image.jpg" height="500">
### Save an image
Images can be saved (without annotations) using the `vipy.image.Image.saveas` method. Calling this method with no arguments will save to a random temporary image. In this example, we crop the image, convert from RGB colorspace to BGR colorspace, flip up/down and resize.
```python
>>> vipy.image.owl().centersquare().bgr().flipud().mindim(224).saveas('save_an_image.jpg')
```
<img src="https://raw.githubusercontent.com/visym/vipy/master/docs/tutorials/save_an_image.jpg" height="300">
### Convert image colorspace
All images can be converted between different colorspaces (e.g. RGB, BGR, RGBA, BGRA, HSV, GREY, LUM, float). This will convert the underlying pixel buffer to support the corresponding colorspace.
```
>>> vipy.image.owl().hsv().saveas('hsv.jpg')
```
### Rescale image
All images can be rescaled to a standard range, including the Matlab inspired `vipy.image.Image.mat2gray`, which will rescale the pixel buffer between [min, max] -> [0, 1]
This rescaling will take advantage of numba optimization if the optimal numba package is installed
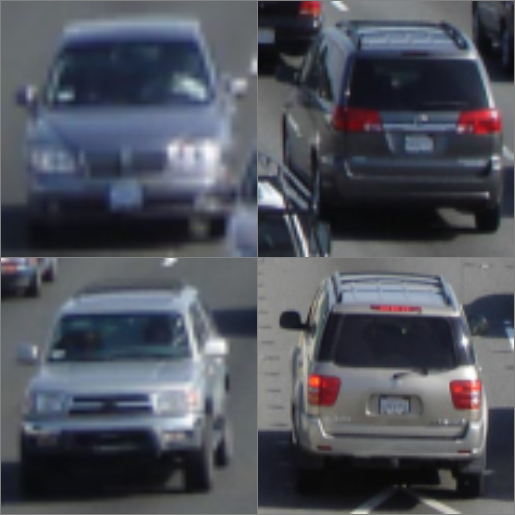
### Visualize scenes
Scenes containing objects can be visualized to display only a subset of objects. In this example, we show the demo image `vipy.image.vehicles` which contains four annotated vehicles. There are many more vehicles in this image, but the end user may be interested in these four in particular. Each object is represented internally as a list of `vipy.object.Detection` objects which encodes a bounding box and category. This can be visualized just as with images with single objects.
```python
>>> vipy.image.vehicles().show().objects()
[<vipy.object.detection: category="car", bbox=(xmin=210.2, ymin=263.2, width=41.1, height=32.6)>,
<vipy.object.detection: category="car", bbox=(xmin=626.7, ymin=336.0, width=77.9, height=65.5)>,
<vipy.object.detection: category="car", bbox=(xmin=140.8, ymin=284.5, width=53.1, height=53.1)>,
<vipy.object.detection: category="car", bbox=(xmin=394.2, ymin=396.8, width=99.5, height=87.4)>]
```
<img src="https://raw.githubusercontent.com/visym/vipy/master/docs/tutorials/visualize_complex_scenes.jpg" height="500">
### Get all of the object categories
```python
im = vipy.image.people()
categories = set(o.category() for o in im.objects())
```
### Get all of the object boxes
```python
im = vipy.image.people()
ulbr_boxes = [o.ulbr() for o in im.objects()] # [(xmin,ymin,xmax,ymax),...] in upper-left-bottom-roght boxformat
xywh_boxes = [o.xywh() for o in im.objects()] # [(xmin,ymin,width,height),...] in upper-left-width-height box format
```
### Crop and resize annotated objects in a scene
```python
>>> im = vipy.image.vehicles().show()
>>> vipy.visualize.montage([o.objectsquare(dilate=1.2) for o in im]).show()
```
<img src="https://raw.githubusercontent.com/visym/vipy/master/docs/tutorials/vipy_image_vehicles.png" height="300">
<img src="https://raw.githubusercontent.com/visym/vipy/master/docs/tutorials/vipy_image_vehicles_objectcrop.png" height="300">
When iterating over a scene, each object yielded is a `vipy.image.Scene` with a single object. Objectsquare will crop the image using the bounding box equal to the union of all boxes in the current scene. dilate will expand the size of the object bounding boxes by a scale factor. The result is a cropped square image for each object that is centered on the object. You can access the pixels for each cropped object, with ot without forcing the cropped region to be square:
```python
>>> pixels = [o.objectsquare(dilate=1.2).array() for o in im]
>>> pixels = [o.objectcrop(dilate=1.2).array() for o in im] # don't force cropped region to be square
```
As with all other `vipy.image.Scene` objects, the original image can be arbitrarily transformed such as resizing or padded prior to exporting the object pixels.
### Find all images in directory
Searching for all images recursively from a root directory and lazy load them as `vipy.image.Image` objects. This will not trigger loading pixels until the pixel buffers are needed. This is helpful for importing large number of images.
```python
>>> [vipy.image.Image(filename=f) for f in vipy.util.findimages('./docs/tutorials')]
[<vipy.image: filename="/Users/myaccount/dev/vipy/docs/tutorials/transform_an_image_1.jpg">, <vipy.image: filename="/Users/myaccount/dev/vipy/docs/tutorials/transform_an_image_2.jpg">, ...
```
### Export scene to JSON
All annotated images can be imported and exported to an open JSON format. If images are loaded, then the pixels will be serialized in the JSON output. If this is not desired, then use the `vipy.image.Image.flush`` method to clear the cached pixel buffer prior to serialization. This can always be reloaded after deserialization as long as the source image or URL is acessible.
```python
>>> json = vipy.image.owl().flush().json()
>>> im = vipy.image.Scene.from_json(json)
>>> print(json)
'{"_filename":"\\/Users\\/myaccount\\/.vipy\\/1920px-Bubo_virginianus_06.jpg","_url":"https:\\/\\/upload.wikimedia.org\\/wikipedia\\/commons\\/thumb\\/2\\/23\\/Bubo_virginianus_06.jpg\\/1920px-Bubo_virginianus_06.jpg","_loader":null,"_array":null,"_colorspace":"rgb","attributes":{},"_category":"Nature","_objectlist":[{"_xmin":93.33333333333333,"_ymin":85.33333333333333,"_xmax":466.6666666666667,"_ymax":645.3333333333334,"_id":"a047e21d","_label":"Great Horned Owl","_shortlabel":"Great Horned Owl"}]}'
```
### Export scene to CSV
All annotated images can be exported to a CSV format using object iterators. Object precision can be changed using `vipy.object.Detection.int`. CSV headers can be added with `vipy.util.writecsv`.
```python
>>> im = vipy.image.vehicles()
>>> vipy.util.writecsv([(im.filename(), o.category(), o.xmin(), o.ymin(), o.width(), o.height()) for o in im.objects()], 'out.csv')
>>> cat out.csv
/Users/myaccount/.vipy/I-80_Eastshore_Fwy.jpg,car,210.2222222222222,263.2,41.06666666666666,32.622222222222206
/Users/myaccount/.vipy/I-80_Eastshore_Fwy.jpg,car,626.6666666666666,336.0444444444444,77.86666666666667,65.4666666666667
/Users/myaccount/.vipy/I-80_Eastshore_Fwy.jpg,car,140.84444444444443,284.4888888888889,53.066666666666634,53.111111111111086
/Users/myaccount/.vipy/I-80_Eastshore_Fwy.jpg,car,394.17777777777775,396.84444444444443,99.4666666666667,87.37777777777774
```
### Image deduplication
Vipy provides a 128 bit differential perceptual hashing function which is used for near-duplicate detection. This is useful for identifying pairs of images that differ slightly due to cropping, resizing, watermarkings. The binary Hamming distance between two perceptual hashes is a similarity metric that can be used to identify duplicates, such that smaller is more likely to be a duplicate.
```python
>>> p = vipy.image.vehicles().perceptualhash() # hex string
>>> print(p)
'50515541d545f04101a005e801c25945'
>>> q = vipy.image.vehicles().greyscale().perceptualhash()
>>> print(q)
'50515541d545f04101a905e801c27945'
>>> vipy.image.Image.perceptualhash_distance(p, q) # Hamming distance
3
```
The perceptual hash function also allows for ignoring detected objects in the foreground. A background hash `vipy.image.Scene.bghash` computes the perceptual hash function using only the regions not contained within the foreground bounding boxes. This is useful for identifying near duplicate background locations where there may be different foreground objects in the scene between images. If the `vipy.image.Scene` has no associated foreground objects, then the background hash is equivalent to the perceptual hash above.
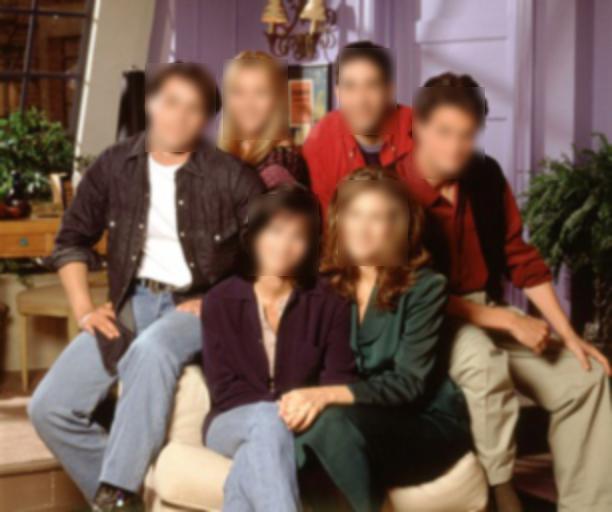
### Blur Faces
```python
>>> im = vipy.image.Image(url='https://upload.wikimedia.org/wikipedia/en/d/d6/Friends_season_one_cast.jpg')
>>> im.facepixelize().show()
>>> im.faceblur().show()
```
<img src="https://raw.githubusercontent.com/visym/vipy/master/docs/tutorials/blur_faces_1.jpg" height="250">
<img src="https://raw.githubusercontent.com/visym/vipy/master/docs/tutorials/blur_faces_2.jpg" height="250">
This is an experimental feature and may be removed in future releases.
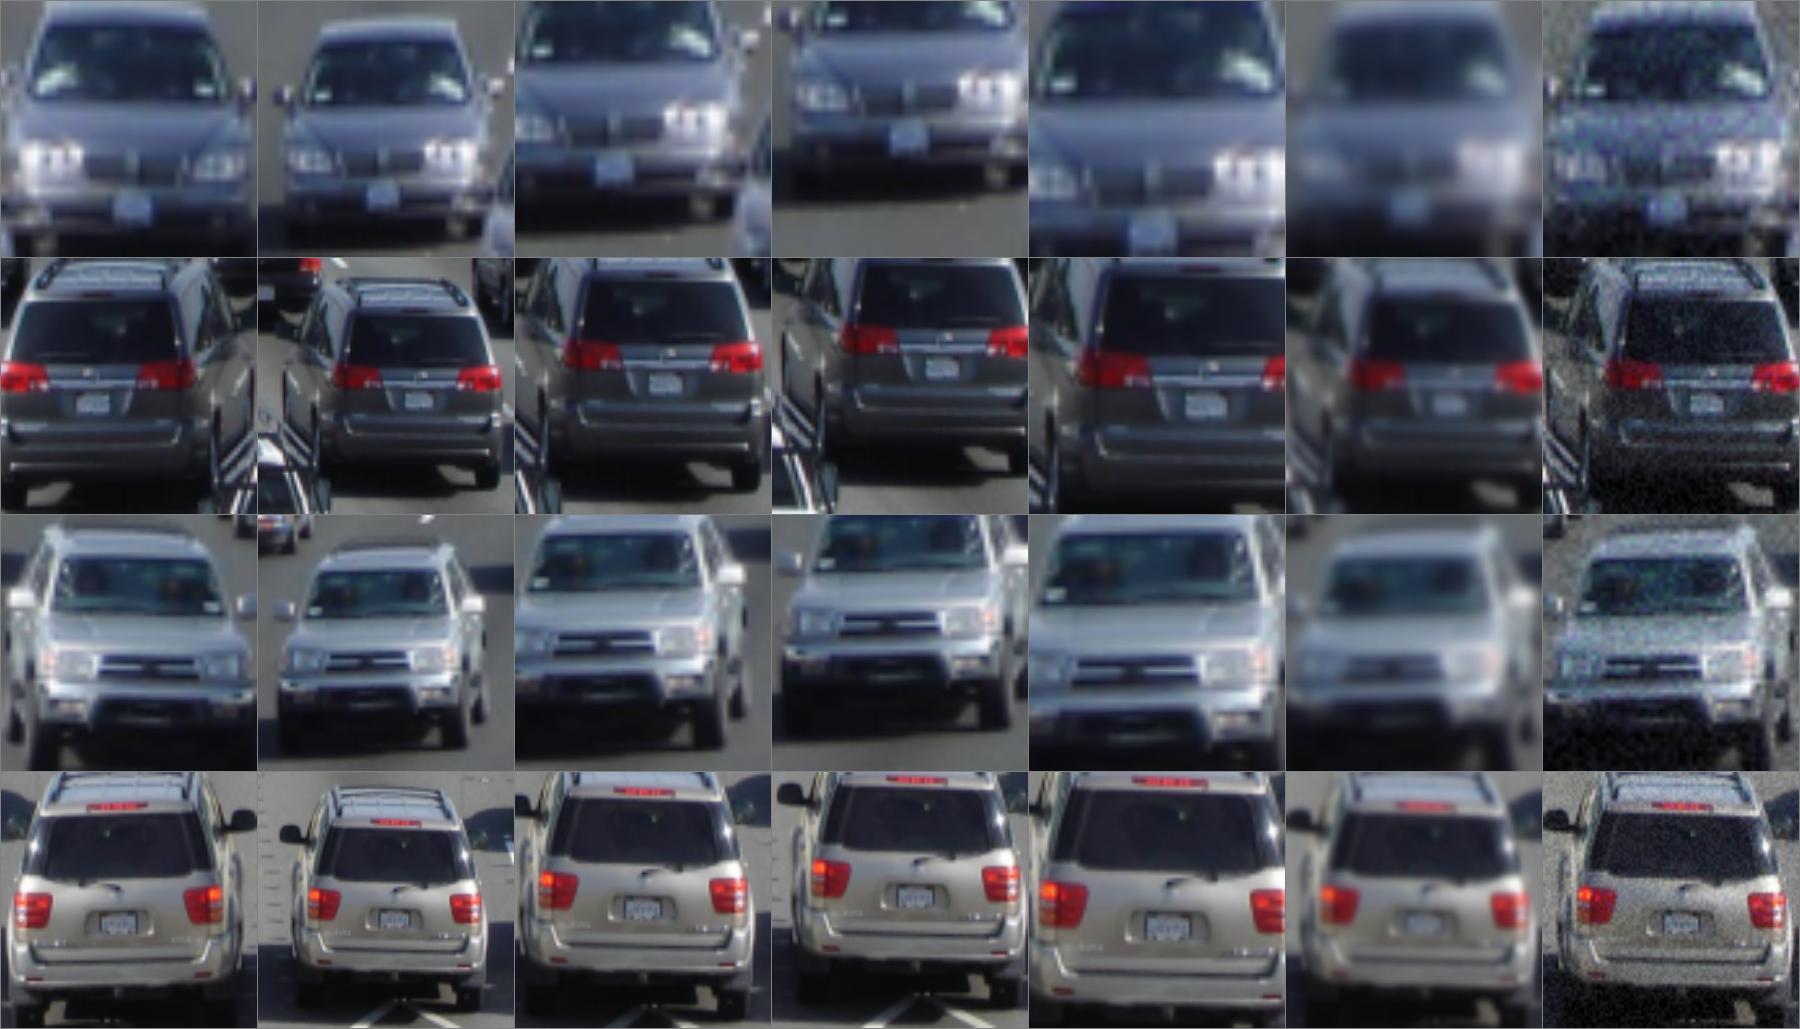
### Data augmentation for training
Data augmentation is the process of introducing synthetic transformations of a given image to introduce additional variation during training. Data augmentation considers scales, crops, translations, mirrors, rotations or chromatic noise which are applied to a source image to generate one or more augmentations. All pixel buffers are shared by default for speed, so the clone() method will enforce that pixel buffers are copied when needed.
```python
im = vipy.image.vehicles()
vipy.visualize.montage([[o.crop().fliplr(), # spatial mirror
o.clone().dilate(1.2).crop(), # zoom out
o.clone().translate(4,5).crop(), # translation
o.clone().translate(-2,9).crop(), # translation
o.clone().dilate(0.8).crop(), # zoom in
o.crop().blur(sigma=1), # spatial blur
o.crop().additive_noise()] # chromatic noise
for o in im]) # for all objects in the scene
```
<img src="https://raw.githubusercontent.com/visym/vipy/master/docs/tutorials/data_augmentation_for_training.jpg" height="350">
These functions have been integrated into a single package `vipy.noise` which implements photometric and geometric perturbations.
```python
im = vipy.image.vehicles()
new_im = vipy.noise.randomcrop(im)
```
The image returned is cloned, and includes the provenance of the noise source in new_im.attributes
### Vipy and Torchvision
All vipy objects can be exported to torch tensors:
```python
im = vipy.image.vehicles().load().tensor(order='CHW')
```
with axis permutations to export in channel first order used by pytorch tensors.
### Visualization behind SSH
Data repositories are often accessed via data storage behind SSH. You can set up port forwarding to visualize this data, but this may require root access to configure firewall rules. If you have SSH public key access to your cluster machine, you can do the following:
On a remote machine (e.g. the cluster machine you have accessed via ssh), run:
```python
remote>>> vipy.util.scpsave(vipy.image.owl())
[vipy.util.scpsave]: On a local machine where you have public key ssh access to this remote machine run:
>>> V = vipy.util.scpload('scp://hostname:/var/folders/sn/6n34qjp513742_5y3lvmhnlw0000gn/T/c4237a25a99b776f.json')
```
Then, on your local machine (e.g. your laptop), run the command output above:
```python
local>>> print(vipy.util.scpload('scp://hostname:/var/folders/sn/6n34qjp513742_5y3lvmhnlw0000gn/T/c4237a25a99b776f.json'))
<vipy.image.scene: height=640, width=512, color=rgb, filename="/tmp/.vipy/1920px-Bubo_virginianus_06.jpg", url=https://upload.wikimedia.org/wikipedia/commons/thumb/2/23/Bubo_virginianus_06.jpg/1920px-Bubo_virginianus_06.jpg, category="Nature", objects=1>
```
The method `vipy.util.scpsave` will save a list of vipy objects to a temporary archive file, such that the URL of each object is prepended with "scp://". When calling `vipy.util.scpload` on the local machine, this will fetch the pickle file from the remote machine via scp using the default public key. Then, when each vipy object is accessed, it will fetch the URL of the media object via scp from the remote machine. This provides an on-demand fetching of each image from a data storage behind a SSH server without any port forwarding, and uses public key scp. This allows for visualization of datasets that cannot be copied locally, but can be reduced on the local machine which are then fetched for visualization.
### Visualization behind AWS S3
Data repositories are often stored with cloud service providers, such as Amazon AWS. These providers require credentials to access URLs in Simple Storage Service (S3). Vipy supports accessing AWS S3 URLs with credential restricted access. Set the following environment variables for the access key and secret access key provided by Amazon AWS. Follow the links below to get a key:
* **VIPY_AWS_ACCESS_KEY_ID**='MYKEY'. This is the [AWS key](https://docs.aws.amazon.com/general/latest/gr/aws-sec-cred-types.html) to download urls of the form "s3://".
* **VIPY_AWS_SECRET_ACCESS_KEY**='MYKEY'. This is the [AWS secret key](https://docs.aws.amazon.com/general/latest/gr/aws-sec-cred-types.html) to download urls of the form "s3://".
Then prepend the URL scheme "s3://BUCKET_NAME.s3.amazonaws.com/OBJECT_PATH" when constructing a URL. Here is an example that we use for [Visym Collector](https://visym.com/collector) to store videos uploaded from around the world:
```python
>>> vipy.image.Image(url="s3://bucket/path/to/file.mp4")
```
Finally, if the credentials you provide are authorized to access this bucket and object, then this object will be downloaded on-demand when the pixels are needed. This provides a convenient method of on-demand downloading and caching of large datasets.
## Videos
### Load from YouTube
```python
v = vipy.video.Video(url='https://youtu.be/kpBCzzzX6zA').download()
```
### Inspect the FFMPEG command line
```python
print(vipy.video.Video(filename='/path/to/in.mp4').mindim(512).framerate(2).commandline())
```
```
'ffmpeg -i /path/to/in.mp4 -filter_complex "[0]fps=fps=2.0:round=up[s0];[s0]scale=-1:512[s1]" -map "[s1]" dummyfile'
```
### Export frames as vipy images
```python
frames = [im for im in v.framerate(1)] # 1 Hz export
```
### Export frames as numpy array
```python
frames = v.framerate(0.1).numpy() # 0.1 Hz export
```
### Generate WEBP animations
```python
v = vipy.video.RandomScene().clip(0,30).webp()
```
### Find all videos in directory
```python
dataset = vipy.dataset.Dataset.from_directory('/path/to/dir', filetype='mp4')
```
### Import RTSP camera streams
```python
v = vipy.video.Video(url='rtsp://user:password@10.0.1.19/live0')
```
An RTSP camera can be modified to change the framerate or the resolution then the video can be streamed live or iterated as with other videos'
```python
vipy.video.Video(url='rtsp://user:password@10.0.1.19/live0', framerate=5).mindim(256).show()
```
To grab a single frame:
```python
im = vipy.video.Video(url='rtsp://user:password@10.0.1.19/live0').frame()
```
To iterate:
```python
for im in vipy.video.Video(url='rtsp://user:password@10.0.1.19/live0'):
print(im)
```
To save to a video file:
```python
vipy.video.Video(url='rtsp://user:password@10.0.1.19/live0').save('/path/to/video.mp4')
```
You will need to interrupt the saving when you're done and the video up to that point will be available in the video file
### Split a video into activity clips
```python
clips = vipy.video.RandomScene().activityclip()
```
Each clip is a separate video with a single activity, such that the video is clipped at the temporal extent of this activity
### Split a video into track clips
```python
clips = vipy.video.RandomScene().trackclip()
```
Each clip is a separate video with a single track, such that the video is clipped at the temporal extent of this track
### Create quicklooks for fast video watching
```python
vipy.video.RandomScene().quicklook(),show()
```
A quicklook is a montage constructed by nine frames sampled from the video. This is a convenient way to visualize a video
### Export to JSON
```python
vipy.video.RandomScene().flush().json()
```
## Datasets
### Load a dataset from the registry
```python
vipy.dataset.registry('mnist')
```
The registry is the common entry point for loading collections of annotated visual data. The datasets are downloaded and imported when requested. Datasets are constructed as a large number of python objects, which can lead to slow garbage collection. During registry import, the garbage collector is frozen by default, so that the loaded dataset is disabled for reference cycle counting.
### Shuffling
Shuffling a dataset uniformly at random can lead to inefficiencies due to random data access. The `vipy.dataset.Datase.shuffle` method support uniform random shuffling, but it will attempt to use a more efficient streaming shuffler to allow for iterative access rather than random access. This streaming shuffler will shuffle the underlying dataset (or dataset shards) rather than shuffling the dataset index. This leads to better data locality in data access and more efficient iterative access for large datasets.
### Download a dataset with URLs
```python
with vipy.parallel.multiprocessing(4):
vipy.dataset.registry('kinetics').map(vipy.video.Transform.downloader(outdir='/tmp'))
```
This will download the youtube videos from the kinetics dataset with four parallel processes. Videos will be stored in the requested outdir.
### Create a dataset from images
```python
D = vipy.dataset.Dataset.from_directory('/path/to/dir', filetype='images')
```
### Determine the set of classes
```python
trainset = vipy.dataset.registry('cifar10')
print(trainset.set(lambda im: im.category()))
```
### Count objects in a scene
```python
im = vipy.dataset.registry('coco_2014').takeone()
vipy.dataset.Dataset(im.objects()).frequency(lambda o: o.category())
```
Return a dictionary of the counts of object categories from a random coco-2014 scene.
### Take a subset
```python
trainset = vipy.dataset.registry('cifar10')
print(trainset.take(1024))
```
### Compute inverse frequency weights
```python
vipy.dataset.registry('cifar10').inverse_frequency(lambda im: im.category())
```
These weights can be used for weighting a loss function for imbalanced classes.
### Iterate over minibatches
```python
for b in vipy.dataset.registry('cifar10').minibatch(128):
print(b)
```
### Iterate over minibatches with parallel preprocessing
```python
with vipy.globals.multiprocessing(4):
for b in vipy.dataset.registry('cifar10').minibatch(128, loader=vipy.image.Transform.to_tensor(shape=(16,16), gain=1/255)):
print(b) # these batches have been preprocessed to shape (16,16) and in the range [0,1]
```
### Combine datasets as a union
```python
vipy.dataset.registry(('mnist', 'cifar10', 'caltech101'))
```
A dataset untion will iterate over the component datasets
# Contact
Visym Labs <<info@visym.com>>
"""
# Import key subpackages
import vipy.show # matplotlib first
import vipy.activity
import vipy.annotation
#import vipy.calibration
import vipy.dataset
import vipy.downloader
import vipy.geometry
import vipy.image
#import vipy.linalg
import vipy.math
import vipy.object
import vipy.util
import vipy.version
import vipy.video
import vipy.visualize
# Top level functions
# >>> vipy.save(...)
from vipy.util import save, load, env
__version__ = vipy.version.VERSIONSub-modules
vipy.activityvipy.annotationvipy.batchvipy.calibrationvipy.datavipy.datasetvipy.downloadervipy.flowvipy.geometryvipy.globalsvipy.guivipy.imagevipy.linalgvipy.mathvipy.metricsvipy.noisevipy.objectvipy.parallelvipy.pyramidvipy.showvipy.torchvipy.utilvipy.versionvipy.videovipy.visualize